添加底部badge
首先为项目中添加更多颜色样式类,会后面定制化页面样式准备。
在themes/maupassant/source/css/style.scss中的头部添加颜色样式如下:
1$theme-colors: (2 "golden-sand": #eccc68,3 "coral": #ff7f50,4 "wild-watermelon":#ff6b81,5 "peace":#a4b0be,6 "grisaille":#57606f,7 "Orange":#ffa502,8 "bruschetta-tomato":#ff6348,9 "watermelon":#ff4757,10 "bay-wharf":#747d8c,11 "prestige-blue":#2f3542,12 "lime-soap":#7bed9f,13 "french-sky-blue":#70a1ff,14 "saturated-sky":#5352ed,15 "white":#ffffff,13 collapsed lines
16 "city-lights":#dfe4ea,17 "ufo-green":#2ed573,18 "clear-chill":#1e90ff,19 "bright-greek":#3742fa,20 "anti-flash-white":#f1f2f6,21 "twinkle-blue":#ced6e0,22);23
24@each $name, $color in $theme-colors {25 .color-#{$name} {26 background-color: $color;27 }28}这里的颜色主题我是在flatuicolors找的,你也可以随意更换为你喜欢的颜色主题。
在themes/maupassant/source/css/style.scss的尾部添加badge样式,代码如下:
1.footer-remark {2 display: flex;3 justify-content: center;4 align-items: center;5 flex-wrap: wrap;6}7
8.github-badge {9 border-radius: 4px;10 text-shadow: none;11 font-size: 12px;12 color: #fff;13 line-height: 1.25;14 margin: 6px;15 display: flex;20 collapsed lines
16
17 a {18 color: #fff;19 }20
21 .badge-subject {22 display: inline-block;23 background-color: #555;24 padding: 4px 4px 4px 6px;25 border-top-left-radius: 4px;26 border-bottom-left-radius: 4px;27 }28
29 .badge-value {30 display: inline-block;31 padding: 4px 6px 4px 4px;32 border-top-right-radius: 4px;33 border-bottom-right-radius: 4px;34 }35}在themes/maupassant/layout/_partial/footer.pug的代码,全部替换为下面代码:
1div#footer2 div3 span Copyright4 |5 |6 span(class="fa fa-copyright") 20227 |8 |9 a(href=url_for('.'), rel='nofollow')= config.title10 |11 a(rel='nofollow', target='_blank', href='https://beian.miit.gov.cn/') | 你自己的备案号12 |13 div(class="footer-remark")14 div(class="github-badge")15 a(href="https:hexo.io", rel='nofollow')13 collapsed lines
16 span(class="badge-subject") Powered by17 span(class="badge-value color-clear-chill") Hexo18 div(class="github-badge")19 a(href="https:hexo.io", rel='nofollow')20 span(class="badge-subject") Theme21 span(class="badge-value color-ufo-green") Maupassant22 div(class="github-badge")23 span(class="badge-subject") 总访问量24 span(class="badge-value color-watermelon" id="busuanzi_value_site_pv")25 div(class="github-badge")26 span(class="badge-subject") 总访问人数27 span(class="badge-value color-coral" id="busuanzi_value_site_uv")28 div(class="github-badge")首页不展示不蒜子计数问题
在我们配置完上面内容之后并部署到服务器上之后,我们会发现,每一篇博文的计数都已经正常显示,但是首页的计数却获取不到,这是因为首页没有加载不蒜子插件的原因。
在themes/maupassant/layout/_partial/head.pug文件中,添加如下代码:
1script(src='https://busuanzi.ibruce.info/busuanzi/2.3/busuanzi.pure.mini.js')修改默认显示宽度
同样还是在themes/maupassant/source/css/style.scss中修改如下代码:
现在显示器已经越来越大,而且大多是电脑用户,可以适当调大页面显示区域。
1.body_container {2 padding: 0 60px;3 max-width: 1440px; /* 由1150px 调整为了 1440px */4 margin: 0 auto;5}添加置顶样式
hexo中自带了文章置顶功能,只要在文元信息中设置sticky: 1000即可,其中数值越大级别越高。
当时设置完成了之后查看样式,管理员和访客都无法区分普通文章与置顶文章,因为他们的样式上一模一样。
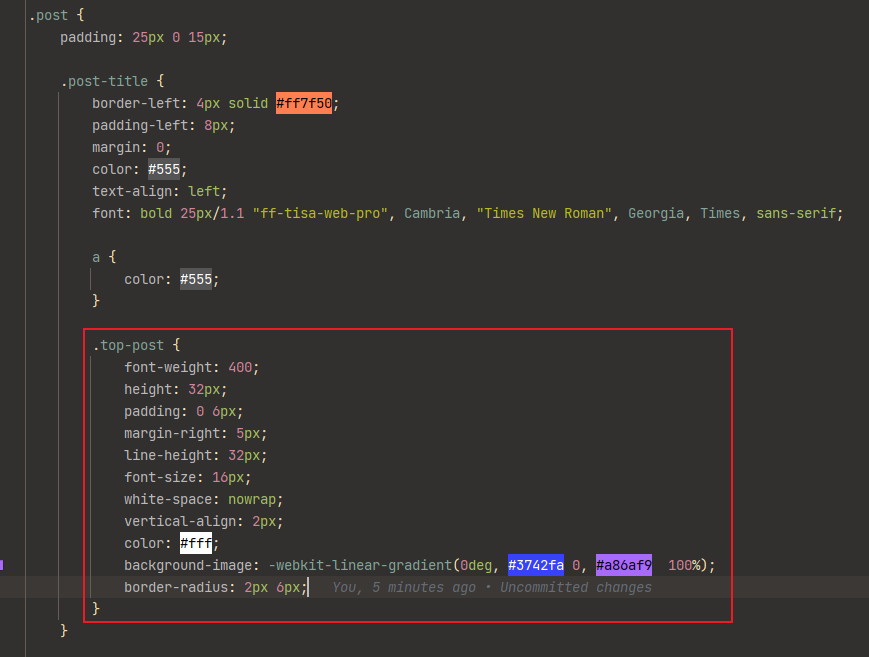
所以接下来,我们在themes/maupassant/source/css/style.scss文件中的.post .post-title下给置顶文章添加一些样式。
1.top-post {2 font-weight: 400;3 height: 32px;4 padding: 0 6px;5 margin-right: 5px;6 line-height: 32px;7 font-size: 16px;8 white-space: nowrap;9 vertical-align: 2px;10 color: #fff;11 background-image: -webkit-linear-gradient(0deg, #3742fa 0, #a86af9 100%);12 border-radius: 2px 6px;13}具体位置如下图所示:
在themes/maupassant/layout/index.pug中修改一下标题,添加两行代码即可:
1block content2 for post in page.posts.toArray()3 .post4 h1.post-title5 if post.sticky6 span(class="top-post") 置顶7 include _partial/helpers.pug8 a(href=url_for(post.path))9 +title(post)修改网页字体
每个程序员可能都折腾多代码主题,其中字体也是大家各有偏爱,有的喜欢苹果的source code pro,有的喜欢monospace,或者是微软雅黑,而我比较钟爱jetbrains-mono,接下来就把页面的字体改一下吧。
- 去官网下载字体Jetbrains Mono。
- 解压将字体文件
JetBrainsMono-Regular.ttf放入到themes/maupassant/source/css文件夹中。 - 在
themes/maupassant/source/css/style.scss中的添加如下代码:
1@font-face {2 font-family: "jetbrains-mono"; //自定义字体名称3 src: url('./JetBrainsMono-Regular.ttf'); //你的字体包路径4}- 在
style.scss中全局搜索font-family属性,在所以属性之前加入自定义字体,代码如下:
1body {2 background-color: #FFF;3 color: #444;4 font-family: "jetbrains-mono", SimSun, sans-serif; /* 修改这里 */5 -webkit-font-smoothing: antialiased;6 -moz-osx-font-smoothing: grayscale;7 font-size: 14px;8}这里注意,类似下面的样式不要修改,font-family和content同时出现的不要修改font-family属性,这个是字体文件。
1&:before {2 font-family: "FontAwesome";3 content: "\f073";4 padding-right: 0.3em;5}发现问题:我们看看页面,发现所有的页面都已经是我们想要的字体了,但是代码块中的字体却没有生效。
解决方案:
- 在
_config.maupassant.yml中找到属性external_css设置为true。 - 创建
source/css文件夹,并在此文件夹下,创建external.css文件。 - 在
external.css文件中,新增如下代码:
1code[class*="language-"],2pre[class*="language-"] {3 font-family: "jetbrains-mono", sans-serif;4}清除缓存hexo cl,重新生成文件hexo g,重跑服务hexo s,即可看到样式正常啦。
添加广告区域
虽然广告有点烦人,但是我觉得好的广告是可以让人觉得有用的。
- 在
_config.maupassant.yml中的widgets属性中,找一个合适的位置插入ad,代码如下:
1widgets: ## Seven widgets in sidebar provided: search, info, category, tag, ad, recent_posts, recent_comments and links.2 - search3 - info4 - category5 - tag6 - ad7 - recent_posts8 - recent_comments9 - links- 创建页面
themes/maupassant/layout/_widget/ad.pug,加入代码如下:
1.widget2 .widget-title3 i.fa.fa-bell-o= ' 广告'4 div(style="margin:3px 0;")5 a(href="https://www.aliyun.com/minisite/goods?userCode=ktv3zgyc") # 替换为你自己的跳转连接6 img.nofancybox(src="https://cirry.cn/img/aliyun-cloud.jpg" style="width:100%;") # src修改为你自己想要展示的图片路径- 将你的图片放在
themes/maupassant/source/img下即可。