2022-11-17更新
今天发现博客的评论功能忽然失效了,发现是版本更新的问题。之前一直都是引用的最新的waline代码,现在改成引入固定版本的waline代码了。
在themes/maupassant/layout/_partial/comments.pug文件中修改如下代码:
这一行代码:
1script(src='//unpkg.com/@waline/client@v2/dist/waline.js')替换为:
1script(src='//unpkg.com/@waline/client@v2.12/dist/waline.js')前提
- 带有docker环境的服务器
- 会使用docker-compose、postgres和caddy
这里我们采用docker + waline + postgres + caddy 来自搭部署评论系统,详细细节可以参考waline官网。
配置postgres数据库
提示:如果你没有数据库,也可以使用系统自带的sqlite数据库来部署。
先查看下官方多数据库服务支持文档中的postgres数据库支持,需要先创建好表和表结构。
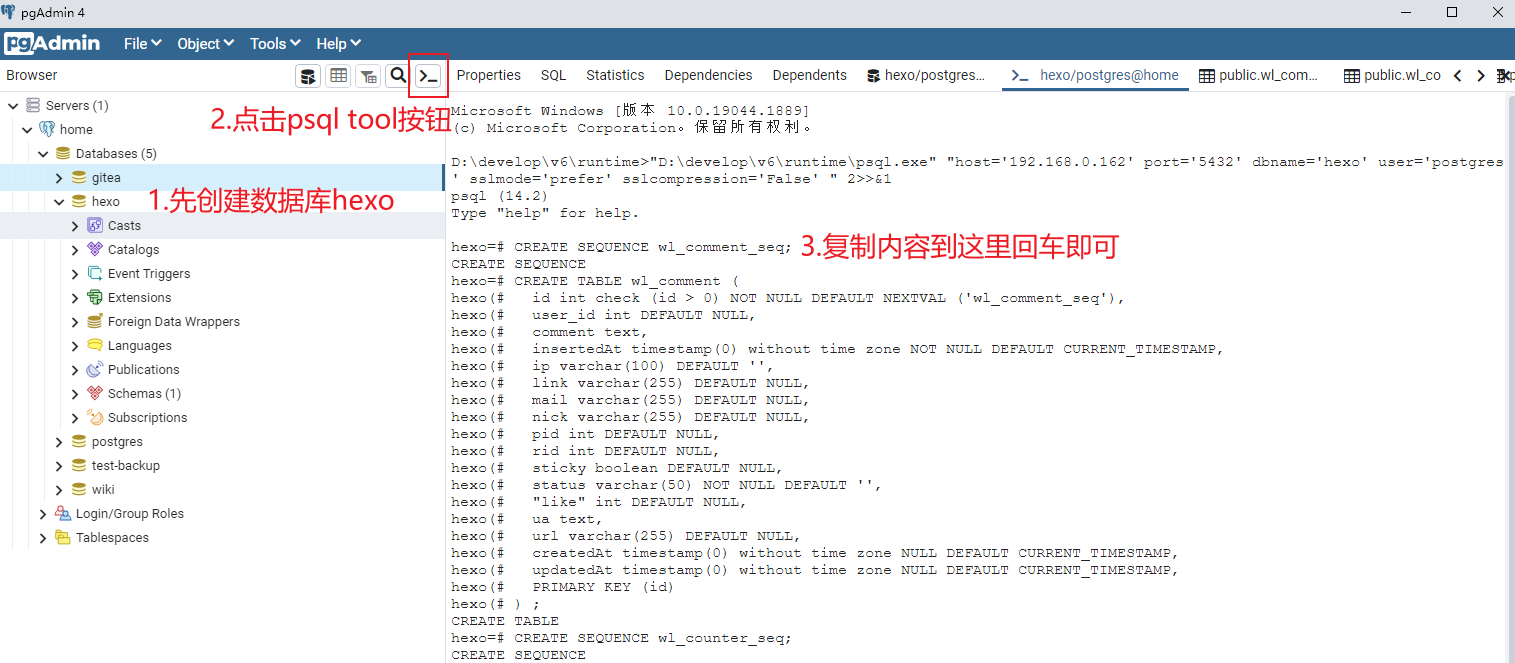
在https://github.com/walinejs/waline/blob/main/assets/waline.pgsql中,直接复制内容到postgres命令行中运行即可创建成功,这里我用的是pgAdmin(postgres的管理工具)。
如果打不开官网,也可以复制下面的内容的直接到数据库命令行中回车即可。
1CREATE SEQUENCE wl_comment_seq;2
3CREATE TABLE wl_comment (4 id int check (id > 0) NOT NULL DEFAULT NEXTVAL ('wl_comment_seq'),5 user_id int DEFAULT NULL,6 comment text,7 insertedAt timestamp(0) without time zone NOT NULL DEFAULT CURRENT_TIMESTAMP,8 ip varchar(100) DEFAULT '',9 link varchar(255) DEFAULT NULL,10 mail varchar(255) DEFAULT NULL,11 nick varchar(255) DEFAULT NULL,12 pid int DEFAULT NULL,13 rid int DEFAULT NULL,14 sticky boolean DEFAULT NULL,15 status varchar(50) NOT NULL DEFAULT '',43 collapsed lines
16 "like" int DEFAULT NULL,17 ua text,18 url varchar(255) DEFAULT NULL,19 createdAt timestamp(0) without time zone NULL DEFAULT CURRENT_TIMESTAMP,20 updatedAt timestamp(0) without time zone NULL DEFAULT CURRENT_TIMESTAMP,21 PRIMARY KEY (id)22) ;23
24
25CREATE SEQUENCE wl_counter_seq;26
27CREATE TABLE wl_counter (28 id int check (id > 0) NOT NULL DEFAULT NEXTVAL ('wl_counter_seq'),29 time int DEFAULT NULL,30 url varchar(255) NOT NULL DEFAULT '',31 createdAt timestamp(0) without time zone NULL DEFAULT CURRENT_TIMESTAMP,32 updatedAt timestamp(0) without time zone NULL DEFAULT CURRENT_TIMESTAMP,33 PRIMARY KEY (id)34) ;35
36
37CREATE SEQUENCE wl_users_seq;38
39CREATE TABLE wl_users (40 id int check (id > 0) NOT NULL DEFAULT NEXTVAL ('wl_users_seq'),41 display_name varchar(255) NOT NULL DEFAULT '',42 email varchar(255) NOT NULL DEFAULT '',43 password varchar(255) NOT NULL DEFAULT '',44 type varchar(50) NOT NULL DEFAULT '',45 label varchar(255) DEFAULT NULL,46 url varchar(255) DEFAULT NULL,47 avatar varchar(255) DEFAULT NULL,48 github varchar(255) DEFAULT NULL,49 twitter varchar(255) DEFAULT NULL,50 facebook varchar(255) DEFAULT NULL,51 google varchar(255) DEFAULT NULL,52 weibo varchar(255) DEFAULT NULL,53 qq varchar(255) DEFAULT NULL,54 "2fa" varchar(32) DEFAULT NULL,55 createdAt timestamp(0) without time zone NULL DEFAULT CURRENT_TIMESTAMP,56 updatedAt timestamp(0) without time zone NULL DEFAULT CURRENT_TIMESTAMP,57 PRIMARY KEY (id)58) ;具体创建表流程如下:
docker部署waline
在适当的位置新建docker-compose.yml文件,内容如下:
1version: '3'2
3services:4
5 waline:6
7 container_name: waline8
9 image: lizheming/waline:latest10
11 restart: unless-stopped12
13 ports:24 collapsed lines
14
15 - 9015:8360 # 前面9015的端口号可以任意修改,与其他应用不冲突即可16
17 environment:18
19 TZ: 'Asia/Shanghai'20
21 SITE_NAME: "菜小牛的博客"22
23 SITE_URL: 'https://cirry.cn' # 网站网址24
25 SECURE_DOMAINS: 'cirry.cn' # 域名26
27 AUTHOR_EMAIL: 'cirry6@aliyun.com' # 邮箱28
29 PG_HOST: ******.cirry.fun # 数据库地址,请填写自己的数据库地址30
31 PG_PORT: 5432 # 数据库端口,postgres默认端口号为543232
33 PG_DB: hexo # 数据库名34
35 PG_USER: ****** # 数据库用户,请填写自己的用户名36
37 PG_PASSWORD: ****** # 数据库密码,请填写自己的密码配置Caddy
将搭建好的暴露端口为9015的waline服务,通过caddy反代和添加ssl加密。
1# Caddyfile2# 配置自己的网址,每个人配置不一样,请勿直接复制3https://waline.cirry.cn:66666 {4
5    reverse_proxy localhost:90156
7}
配置主题
在_config.maupassant.yml中,修改如下内容即可:
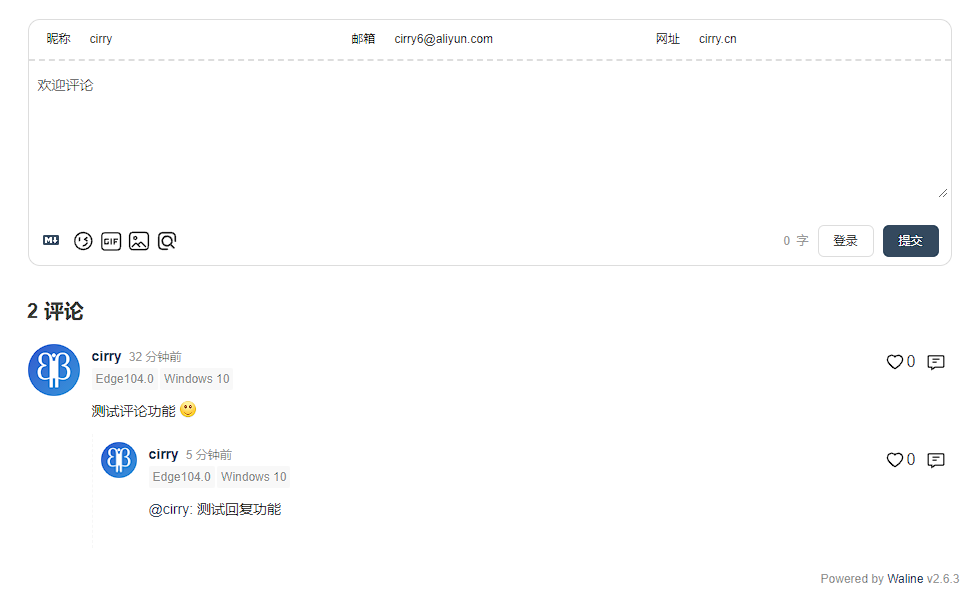
1waline: ## See: https://waline.js.org/2 enable: true ## If you want to use Waline comment system, please set the value to true.3 serverURL: https://waline.cirry.cn:66666 ## Your server url, e.g. https://your-domain.vercel.app4 pageSize: 10 ## The desired number of comments shown in each page.至此,评论功能已经完全自搭在自己的服务器上了,清除缓存,重新运行后,样式如下:
开启侧边栏最近评论功能
虽然在_config.maupassant.yml中的配置项里,有开启最近评论功能,但是配置完成后并没有显示样式。
1widgets: ## Seven widgets in sidebar provided: search, info, category, tag, recent_posts, recent_comments and links.2 - search3 - info4 - category5 - tag6 - recent_posts7 - recent_comments # 挂载最近评论功能8 - links在themes/maupassant/layout/_widget/recent_comments.pug下,我们可以看到主题默认只配置了disqus的最近评论功能,所以接下来,我们自己编写我们的自己的waline最近评论功能。
1if theme.disqus.enable == true2 .widget3 .widget-title4 i.fa.fa-comment-o= ' ' + __('recent_comments')5 script(type='text/javascript', src='//' + theme.disqus.shortname + '.disqus.com/recent_comments_widget.js?num_items=5&hide_avatars=1&avatar_size=32&excerpt_length=20&hide_mods=1')第一步,在_config.maupassant.yml中新增配置项:
1waline: ## See: https://waline.js.org/2 enable: true ## If you want to use Waline comment system, please set the value to true.3 serverURL: https://************ ## Your server url, e.g. https://your-domain.vercel.app4 pageSize: 20 ## The desired number of comments shown in each page.5 wordLimit: 500 ## Limit input word count, 0 means no limit6 requiredMeta: ['nick','mail'] ## required user information e.g. ['nick','mail','link']7 count: 6 ## The number of recent comments,default. 10第二步:在themes/maupassant/layout/_widget/recent_comments.pug 中,修改内容如下:
1if theme.disqus.enable == true2  .widget3    .widget-title4      i.fa.fa-comment-o= ' ' + __('recent_comments')5    script(type='text/javascript', src='//' + theme.disqus.shortname + '.disqus.com/recent_comments_widget.js?num_items=5&hide_avatars=1&avatar_size=32&excerpt_length=20&hide_mods=1')6
7if theme.waline.enable == true8 .widget9 .widget-title10 i.fa.fa-comment-o= ' ' + __('recent_comments')11 #widget-waline-list12 script(type='text/javascript', id="recent-comment", serverURL=theme.waline.serverURL, count=theme.waline.count , src=url_for(theme.js) + '/recent-comments.js' + '?v=' + theme.version, async)第三步:这里涉及到发送请求,所以我们先需要在themes/maupassant/source/js/目录下,创建js文件recent-comments.js。
填写recent-comments.js内容如下:
1!function () {2 let serverURL = document.getElementById("recent-comment").getAttribute("serverURL")3 let count = document.getElementById("recent-comment").getAttribute("count")4 if (!count) {5 count = 106 }7
8 //格式化时间9 function format( date ) {10 return new Date(date).toLocaleString()11 }12
13 // 处理评论14 function dealComment( commentStr ) {15 let re = /<a[^>]*href=['"]([^\\"]*)['"][^>]*>(.*?)<\/a>/g;39 collapsed lines
16 let arr = [];17 while (re.exec(commentStr) != null) {18 arr.push(RegExp.$1); //如果是RegExp.$1那么匹配的就是href里的属性了!19 arr.push(RegExp.$2)20 }21 if (arr.length > 0) { // 说明有匹配到回复22 commentStr = commentStr.replace(/<a[^>](.*?)<\/a>/, arr[1])23 return {24 href: arr[0],25 author: arr[1],26 str: commentStr27 }28 }29 return ''30 }31
32 $.ajax({33 url: serverURL + '/comment?type=recent',34 dataType: 'json',35 data: {36 count37 },38 success: function ( response ) {39 let comments = '<ul>'40 response.forEach(( comment, index ) => {41 comments += '<li>' + (index + 1) + '、 ' + format(comment.insertedAt)42 if (comment.pid) {43 let {href, author, str} = dealComment(comment.comment)44 comments += '<div class="waline-comment-content"><a style="display: block" href=' + window.location.origin + comment.url + href + '>'+ str + '</a></div>'45 } else {46 comments += '<div class="waline-comment-content"><a style="display: block" href=' + window.location.origin + comment.url + '#' + comment.objectId + '>' + comment.comment + '</a></div>'47 }48 comments += '<div class="waline-comment-content-author">' + '--' + comment.nick + '</div></li>'49 })50 comments += '</ul>'51 $('#widget-waline-list').append(comments)52 },53 })54}()这里涉及到了waline提供的获取最近评论接口,在这里查看waline提供的api。
第四步:调整样式
这一步只是针对,有人在评论中填入了emoji表情,emoji会显示很大,我们在themes/maupassant/source/css/style.scss中定位样式,具体位置如下:
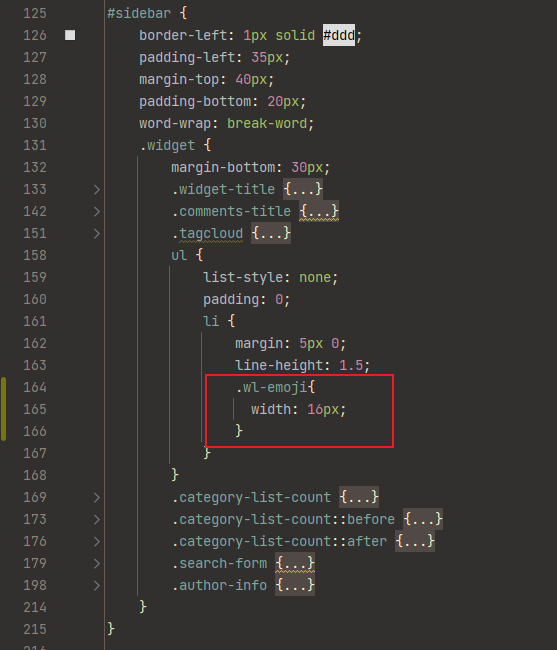
在#sidebar --> .widget --> ul --> li下新增如下代码即可。
1.wl-emoji{2 width: 16px;3}最后,在themes/maupassant/source/css/style.scss中末尾追加如下样式:
1/* recent-comments waline style*/2.waline-comment-content {3 padding: 6px;4 background-color: #f8f8f8;5 border-radius: 6px;6 overflow: auto;7
8 p {9 margin: 0;10 display : -webkit-box;11 overflow: hidden;12 -webkit-box-orient: vertical;13 -webkit-line-clamp: 2; /*这里设置第几行显示省略号,可以设置第一行或者其他行*/14 }15}5 collapsed lines
16
17.waline-comment-content-author {18 text-align: end;19 margin-bottom: 6px;20}开启字数限制和禁用匿名
在themes/maupassant/layout/_partial/comments.pug中找到waline.init方法,在方法中添加一个配置项即可。
1Waline.init({2 el: '#waline',3 comment: true,4 serverURL: '#{theme.waline.serverURL}',5 pageSize: '#{theme.waline.pageSize}',6 wordLimit: 300,7 requiredMeta:['nick', 'mail'],8})提示:waline有自带的垃圾信息过滤功能,但是还是限制一下访客输入比较好,防止有人恶意操作。
开启邮件提醒
这里我直接使用QQEmail做邮件服务商了。
在docker-compose.yml中的environment里添加如下邮件服务商配置信息:
1SMTP_HOST: "smtp.qq.com"2
3SMTP_PORT: 4654
5SMTP_USER: "你的qq邮箱"6
7SMTP_PASS: "qq邮箱提供的授权码"8
9SMTP_SECURE: "true"提示:qq邮箱的授权码在登录qq邮箱之后 --> 设置 --> 账户 --> 生成授权码中获得。
waline也有统计阅读次数的功能,前面已经使用了不蒜子,这里就不重复讲,如果后期不蒜子不好用,可能会切换到这个上。
本文需要的一些知识比较多,如果有不明白的,可以留言,我可以针对性的写个详细的文章。
页面关闭评论功能
如果你在类似关于我或者历史这样的页面中,不希望有评论功能,在对应的文档中的front matter中设置comments: false即可。